Showing posts with label 3D Modeling. Show all posts

Project Review: S.W.A.T. the Movie 2003-PART III-Tactical Personnel Van

 A straight on back shot of the S.W.A.T. van that I built for the feature film marketing. This was designed around a few comps done by the team of Art Directors on the 'pod' for the project back in 2003 while at BLT and Associates as 3D Designer.


 A Worms Eye angle looking up with the back door on this SWAT van, with the back opened up with a few cast members coming at 'Ya.


 A low angled back view with a bit of 'dutch' on the camera, with the back closed up again.


 This overhead shot shows that all details were limited to what was seen in the renders so no front or even side details.


 I went to great detail to be accurate on the door locks and stays that keep the back doors open on these vans so that they would be accurate in style for the iconic vans used by S.W.A.T.


  Here is that back shot in polygons so you can see the level of detail that went into the individual parts on the van.


S.W.A.T. The Movie 2003PART III
The Tactical Personnel Van

Client: Columbia Pictures Inc. via BLT and Associates.
Art Directors: n/a
Project Date: Winter 2002-3.

It this third posting for the work I did for the TV to film adaptation of S.W.A.T., from almost a decade back now. I did this work while I was still an in-house 3D designer at BLT and associates back in 2003. I had done a couple dozen 3D Logos for the film posted here, as well as helping out with the teaser trailer.

In today s blog post we look at the back end of a typical Personnel van used by S.W.A.T. teams in the past, so they wanted an iconic look for the teaser with a van doors.

I built this 3D scene out as all hi-rez, as this was before I perfected my quad modeling techniques over the last decade,  and this was a fast turn around as usual so I did a speed model of the van.

I built out just the back of the van, and a bit of the sides, since we were just creating teaser shots for a few comps using the backside of this van for the posters.

I have a few more posts on S.W.A.T., that I will try and post up these in the future, so keep an eye out.

You can View the logos in PART I here.

You can view the M4 Carbine I built here for PART II

Cheers, THOM
read more "Project Review: S.W.A.T. the Movie 2003-PART III-Tactical Personnel Van"

Project Review: Drive Angry 2011: Blue-Ray-3D Animated Menus

 Here is a final frame from the HD animation for the FBI Badge and leather case.


 Because the Drive Angry badge spins we do see the back so this is a full 360 degree model.


 Here is the Polygon view with mesh smooth ON to see the basic form of the model.


 A "Virtual" necklace worn by Billy Burke as Jonah King in Drive Angry used in the menus.


 Here is the low poly model of the necklace from Drive Angry.


 Here we see it with the mesh-smooth [subdivision added] applied to the above base mesh.


Project Review
Drive Angry 2011 PART I
Blue-Ray-3D Animated Menus

Client: via  Summit Home Entertainment via The Cimarron Group.
Art Director: Brian Larson.
Project Date: February 2011.

About one year ago I did my last job for The Cimarron Group, who were my full time employers for about six years from late 2003 to October 2009. As budgets dropped so did my contributions to Blue Ray Menus, but for Drive Angry, I got the call, and helped render out nearly 500 HD frames of animation for the menus for Brian Larson,with whom I have done a few projects posted here with in the past.

In this PART I posting, I have two main props from the film I recreated in 3D, and I also animated the assets to fly into camera and hit the virtual windshield, our TV screen, as you make your choices in the menu.

In the film there is a Devil Worshiping Cult Leader who is the nemesis of Nick Cage in the film, and I built out his necklace from the film, all Sub-D, as well as the badge for the "Accountant" who is chasing him down from Hell with an FBI badge that magically appears, with his coin toss[ I did that too look for a PART II soon]. William Fichtner does an outstanding job as 'The Accountant', IMO.

Cheers, THOM
read more "Project Review: Drive Angry 2011: Blue-Ray-3D Animated Menus"

Project Review: Launch City PART VIII[ 8th]-The Target Jukebox Design 1999.

Here is the original final shot for Launch CD-zine Issue #40 from 1999 @ 640 x 480 the size limit at the time fro shockwave to run smoothly.


I did a quick open and re-render at a higher rez to show some details[missing a few maps though after 14 years...]


Here is the main screen shot in geometry showing the model details I added in.


The set was a two wall configuration and I built a little conduit with the parked gum pushed up in the crack.


Here is a shot of the full to the floor jukebox as geometry for Launch.com

 Launch City Part VIII
The Target Jukebox design for Issue #40

Client: Launch Media Inc.
Art Director: Myself
Project Date: 1999

In this 8th post on LAUNCH city, I am posting work done on a jukebox built out for a Target sponsored space with a fully animated 3D jukebox.

This was one of my very first projects I worked on when I joined the three man team as Art Director in 1999. I love to model in 3D, and that seems to be something that many people do not like. 
 
To me the fun part is the build itself. I love the process of construction. This may be due to the fact that I am an avid woodworker, copper smith, and I love to sculpt and create, so naturally I would love virtual building too.
 
I made the model close to, but not exact to a famous iconic Juke box from the 50's for the project, and I passed it over to Cayce Justus and he skillfully rigged it up and animated the arm and curtains inside for me.
As a point in 3D history this is the project where I made a material editor breakthrough in 3DSmax with Chrome and Glass and applied it here in the default scan-line rendered. 
 
Remember this was 14 years back, pre GI and all the good render tools we know see as commonplace were not out yet, so lots of ambient lights to simulate bounce etc.

Cheers, THOM

To view PART I on Launch City you can go here.

To view PART II go here.

To view PART III for the Train Station "Twitch" look here.

To view PART-IV look here.

To view PART V- you can click here.

To view PART VI [ the sub!] go here. 

To view PART VII-The Vault, go here.


read more "Project Review: Launch City PART VIII[ 8th]-The Target Jukebox Design 1999."

Project Review: Star Trek:The Original Series: Motion Graphics for DVD sets 2004

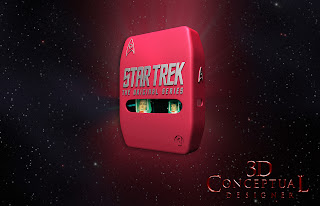
 Frame 001 of the DVD case from Season 2 for Star Trek that I built and animated in 3D for the Home Entertainment release back in 2004.

 Frame 45 into the animation as it turns slow to camera...


 Near the end it flips in 10 frame fast to reveal the embossed badge in the back of the case[ Boolean!]


 Frame 001 from Season three for the DVD set release from Paramount Home Entertainment back in 04'


 This one was a slow roll[ gimbal] so it had 320 frames to the animation.


 Here is the model itself front and back in an ambient shader.

 Here is a quad model view of the box I built for the MGFX move, a screen grab from 3DSmax.


Project Review
Star Trek:The Original Series Seasons 2, and 3
Motion Graphics for DVD sets

Client: Paramount Home Entertainment via The Cimarron Group.
Art Direction: Myself and the whole team.
Project Date: October 2004.

I did an occasional Home Entertainment job while at The Cimarron Group, usually as pick-up work, so for this project, Paramount designed these new molded plastic cases and wanted to do a camera move on them so I built them using the nPower Power Solids modeler to get the complex case built fast enough to use in the animation moved that I rendered for the job. I did season two, and three, in blue and red corresponding to the colors for the uniforms from the original TV show.

The delivery was 450 frames at DV rez and I alpha channeled all files so the Motion Graphics team could drop my 3D into he piece for finishing simple enough. 

Nice thing is they change the packaging every few years so the work is always there cycling through.


Cheers, THOM
read more "Project Review: Star Trek:The Original Series: Motion Graphics for DVD sets 2004"

Project Review: Below 2002: PART II Submarine Wireframe Model


 An overview shot of the full submarine I built for the final Key Art for Below.


 A close up detailing the nose of the submarine that was in many a comp idea prominent with the torpedo bays open for business.


 I cut the holes through the body mesh using the then standard Boolean tools, now I would quad model this out for full resolution needs and use the Pro-Boolean as needed with a quad mesh option ON.


 The 50mm was mounted on the back in this configuration for the film, though many had it up front.


 A tail shot showing the props and rudder assembly as built for this Baldo Class WWII Sub.


Anti-aircraft gun with should cups was mounted and ready for action on this virtual submarine.


Project Review: Below
PART II
Submarine Wire frame views of the Baldo Class Submarine Model


Client: Dimension Films via BLT and Associates.
Art Director: Alon Amir
Project Date: 2002


This is my second posting covering the 3D illustration work that I did that was used in the final Key Art for the film Below, back in 2002, a decade back now. Today my posting shows the geometric makeup of the 3D models that I built back then.

This Sub was built in about 10 hours, and in advertising that is about all the time they have to spare. It is always a challenge to build a complicated prop such as this in just over a day, but I was up for the task, though I did not quad model this, as I was still doing fast high-rez modeling to get the job in on time, so back then that was definitely a limitation I have worked to move away from.

However I have always been a stickler for details and with this Baldo class US WWII submarine, this was how I approached the job, so I included deck cleats molded board and battens and all wires and some rivets as well. Enough to catch a highlight and produce a nice shadow.

You can view PART I from a few years back here.

Cheers, THOM

read more "Project Review: Below 2002: PART II Submarine Wireframe Model"

Project Review: Launch City-PART VII- Destination:The Vault.

 
 This is still one of my top Images I made for Launch.com back in 1999.


 This was pre-quad modeling form me a decade+ back so here are the wire files...


Here is the establishing shot seen first in Issue #40 of Launch.com, this is the main lower area with a gift-shop in center.


Here is the close up move if you clicked on the center of the image for the shop.


This is the interior of the shop that was filled with advertising for this virtual online city.


At the base of the main staircase, there was a phone booth that we used for a few interviews.


 A corner set up for a multi person interview.


 Used in Issue #42, an interview area with two band members was green screened into this space for the CDzine'.


 The same corner seen above from a different angle, and this illustrates the power of a virtual set, just pick a good angle and shoot!


Launch City Part VI
The Vault

Client: Launch Media Inc.
Art Director: Myself
Project Date: 1999

In this seventh post on LAUNCH city, I am posting work done on the destination called, The Vault. I was hired by my fellow ACCD alumni Goutam Mitra as an ex-imagineer to theme the entire city out for them, and with this space, I had a whole bunch of fun.

I originally handed the space off to fellow ACCD team member John Wee, as a blocked out shell of a building to flesh out, but I ended up going back to it myself after a few weeks.  I completely reworked the space, and finished it out as seen above myself.

Each space in Launch City, had a distinct architectural visual theme, so that the furniture, architecture, and even the fonts would be representative of the space so the viewers would "map' their locations visually back to the space.

Also each space had a minimum of 4-6 locations set up and ready to go for the virtual interviews and performances done for each months CD-zine and online shock wave alternative.

The vault theme, is what is called "The Chicago Style" as practiced by Louis Sullivan, so I used some themes I saw in his work to create this space. Also from the era of the 20's in general, so I used the chairs from the LA train station to fit them into the space as well.

Cheers, THOM

To view PART I on Launch City you can go here.

To view PART II go here.

To view PART III for the Train Station "Twitch" look here.

To view PART-IV look here.

To view PART V- you can click here.

To view PART VI [ the sub!] go here.


read more "Project Review: Launch City-PART VII- Destination:The Vault."

Project Review: The Woman In Black 2011

 The Mansion from The Woman in Black, as built from the scrap from the film as my first delivered 3D render.
 

 I squished the geometry and flattened the courtyard back for this worms eye shot.


 A close up on the front steps. In this comp the foreground was filled with a shot of Daniel Radcliffe looking up at THAT window, like in the trailers...


 Here is a re purposed wall turned into the interior for a fast comp idea.


  Here is a bird's eye shot showing the whole model built. I did not detail the sides we would not see for now, but in 3D it is a quick copy and paste to add that in.


 Here is a quad view close up showing the window and gutter model detailing that went into this comp piece.

 
Project Review:
The Woman in Black Key Art 3D Illustration

Client: CBS Films via Cold Open 
Art Direction:Gardner DeFranceaux
Project Date: Fall 2011.
I have done 3D illustration work on a freelance basis for the kind folks over at Cold Open for a few years now, and always a fun projects throughout the year come my way. 

Cold Open hires me on a freelance basis to do some 3D Illustrations for Key Art Posters,  and my work for them goes well beyond just a metal 3D logo, as so many folks 3D usage from me is more limited. Some of this is due to two ex BLT employees that are in house there, and they certainly "get 3D" so they use me to my full potential. 

For The Woman in Black, I had to re create the main haunted Mansion from the film and render it out stylistically at a few angles. I also was able to stretch and adjust the building for the posters to make the home more dramatic. This is where "Frankenstein" comps in 3D have a distinct advantage, as I can change the prop or set itself and not just cut the image up so the lighting shadows, etc. are perfect.
I built the entire scene all Subdivision Surfaces with a Turbo-smooth applied to achieved the close up and soft detailing. I also re purposed the exterior to do a quick interior shot looking out the window. FUN!


Cheers, THOM
read more "Project Review: The Woman In Black 2011"

Personal Project: The Bugster Coupe- PART II

 I wanted a light grey/silver version with a bright red interior to see the design in a lighter shade.


 This tipped up view shows off the red/black combo that was typical in early VW and Porches of the era.


 Had to try the 'rootbeer' color on this one too, I have seen this color on a 54 VW.


 This ambient render shows the panel seeas better so you can see how I have adjusted the door tops and rear cowl area. Still deciding on rear louver placement, then I finish the tin work up.


 The side view as an Ambient Render,  reveals the decklid is a bit wide and overhangs the rear fender beading, this will be addressed in ROUND 2.0 once I have time to put into her design.


Personal Project
The Bugster Coupe
PART II

So here is Part II, as a follow up to Mondays posting, with some additional images of my Bugster custom VW coupe project I just started this past weekend. As a Transportation design graduate, a project like this is something that I have always wanted to do since a 3D representation of a design is so helpful to do before any metal is cut, and 3D software is the tool to do this as the changes are very fast to implement and see finished the same day, this is a great strength of 3D design.
The model is a work in progress still[ WIP], as I have not welded the big panels into the body yet so I can adjust the overall curves and proportions before it is all one piece. I have some tweaking left to do as well as some design decisions needed to continue, so this is next up.

In the following weeks I have some plans to finish this out, and do the Volksrod alternate version as well, a fender-less I-Beam front ended hot rod version of the Bugster too. I plan to put the uncovered bomber seats from a Speedster in there[ covers on for this one], the Speeedster top and tonneau covers, and I plan to do the entire engine compartment design too showing the huge tray behind the motor now which is about 75% done from when it was going to be used for Herbie[ that portion of the MGFX was scrapped- a motor fly out anim].

Look for more posts as I continue with this personal project in the months ahead.

You can view PART I here.

Cheers, THOM


read more "Personal Project: The Bugster Coupe- PART II"
Copyright © interior car. All Rights Reserved.
Blogger Template designed by Big Homes.